
 It is a sad fact that any computer - even an Apple computer - can suffer a breakdown.
My own daughter's Mac suffered a catastrophic hard drive failure only 11 months after purchase and had to be replaced. Shortly before that, my other daughter's hard drive started playing up and we had to re-format and restore from backup. My neighbour's son lost everything on his computer when his Mac hard drive had issues at 3 years and had to be wiped and re-formatted. Something that every computer user should do, whether on Windows or Mac, is set up a regular backup of that computer. This is absolutely essential to avoid losing precious photos and other important information stored on the computer's hard drive. The good news is that your Apple Mac computer offers an easy way to set up and execute this regular backup. It is a feature called Time Machine Here is a really handy website that answers all sorts of Frequently Asked Questions about Time Machine. If you need help with understanding, setting up, or restoring from Time Machine, contact iTandCoffee on 1800 885 420 or at enquiry@itandcoffee.com.au to make an appointment. (Note. We are in Melbourne, Australia for those of you viewing this article from elsewhere around the world!)
0 Comments
Now, this post is about a topic that many of you would probably rather skim over (or ignore) whenever you come across it. But I implore you to read on, and make sure you do not end up in a similar situation to that which befell someone I know this week.  Three years gone in a moment A very good friend called me this week about a family crisis. Her uni-aged son's 3-year-old MacBook Pro would not start up properly. He had lots of uni assignment work on it - in fact several years worth of all sorts of data that was very important to him. In particular, he desperately needed to access his almost-due assignments for his summer uni subjects. Unfortunately, something drastic had happened and had left all the data on his hard drive 'scrambled' ... ... and he did not have a backup! He took his Macbook to the Apple Genius Bar in the hope that at least some of his data could be rescued. Sadly, the only thing that could be done with the MacBook was to restore it to factory settings, with the loss of everything - the worst possible outcome for him. It is so devastating when this sort of thing happens to our kids (let alone to ourselves), potentially negatively impacting their studies and results. I have seen similar devastation far too often, when visiting clients who have lost years worth of precious family photos and family documents due to computer/device failure or theft. In too many cases, it takes a disastrous event like this one to highlight the value of the information and content that our computers contain, and that we perhaps have no 'insurance policy' covering our valuable and irreplaceable digital property. For our kids, it always seem to happen at the worst time - when they were just about to submit that assignment or project that they had been working on for weeks or months; or perhaps when they are in VCE, studying for their final exams. It has been an incredibly difficult lesson for my friend's son to have to learn: that all computers and mobile devices can fail, sustain damage, break, or be stolen. Content can even be accidentally deleted. In our family alone, we have had three computers suffer damage or hard drive issues in the past 2 years. Additionally, mobile devices have been dropped down the toilet and on the floor, resulting in the need for replacement. Luckily for us, the data from the destroyed/malfunctioning devices was able to be restored to new replacement devices from backups. An iTandCoffee plea to parents and students (and anyone else!) Please pass on this story and the following advice to your school and uni-aged children, as well as heeding it yourself ...
Backup Options Backups do not need to be a pain in the proverbial. Backups can set up to occur automatically over WIFi to a backup drive (such as Apple's Time Capsule), via USB to a external hard disk drive, or even using a cloud-based service such as Dropbox, iCloud, or Google Drive (just to name a few). All Mac computers have a Time Machine feature that allows you to easily set up a regular backup to a external device - a backup that can happen hourly, without you having to do anything. I recommend using more than one of these backup options for the really important digital content on your computer, such as your photos. Keep in mind that, should you be robbed or suffer a fire, you may lose BOTH your computer AND any backup drive that is attached to it. For my important digital content on my computer, I have three main backups - (1) to my Time Capsule hourly, (2) to a portable HDD monthly, which I then carry in my handbag and (3) to Dropbox for my important files (which also) then gives me access to all these file from all my computers and devices) On iPads and iPhones, iCloud backup can be used to automatically back up these devices on a daily basis - without having to plug in to any computer. This is more effective than iTunes backups to a computer, which tend to be done less regularly.  Are you interested in attending a free session on this topic? Depending on the level if interest, iTandCoffee will look to run a free special information session for students and their parents early in the new school/uni year, covering backup and cloud storage options and how to set them up. Register interest by emailing backups@itandcoffee.com.au, providing a contact phone number and any preferences for day/date/time details in Feb/Mar. Need further help or advice? For help setting up backups or using/understanding cloud-based services, please don't hesitate to contact iTandCoffee on 1300 885 420 or email enquiry@itandcoffee.com.au.
In summary, if a passcode has been forgotten, and perhaps the device disabled due to too many attempts, the steps to resolve the problem depend on whether you have an iTunes or iCloud backup of the device and whether you have enabled 'Find my iPhone' (or iPad) on the device.
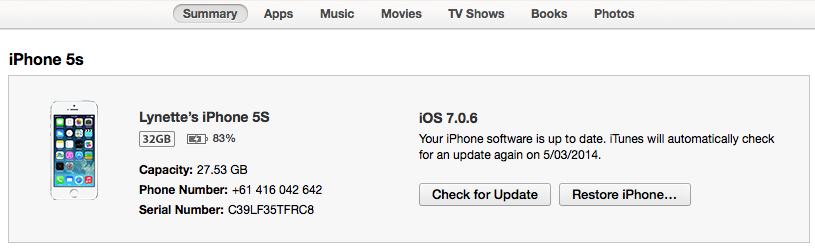
It's pretty bad news if you don't have a backup If you don't have a backup, you will (unfortunately) be forced to erase your device and return it to its factory settings, resulting in the loss of whatever was stored and set up on your device. Restoring your device Here is the Apple Support article that provides the various recovery and restoration options. Needless to say, if you have any issues understanding or following these instructions, contact iTandCoffee on 1300 885 420 or enquiry@itandcoffee.com.au. 20/11/2014 0 Comments When you accidentally delete something from your iPhone or iPad - can you get it back?This week I had a visit from a client, who was desperate to recover some very important Notes that were inadvertently deleted from her iPhone. She had visited the Genius Bar at the Apple Store, but was told that there was not really any way of recovering the information that she had lost. So she came to see me to find out if there was any possibility of retrieving these lost Notes, especially given that she had regularly backed up her iPhone to iTunes on her Macbook as well as backing up to iCloud. The answer is ... maybe! While the iCloud backup is unlikely to be of any help in retrieving the lost Notes, it is possible that the lost data is still available in the iTunes backups that are saved to her Macbook. So what's the difference between these two types of backup. The below is taken from a article that talks about i-Device backups. (Read more here if you are interested.) ... iTunes backups are different than iCloud backups. When you back up via iTunes, you’ll get a complete copy of all the data on your device so you can restore your device to the same exact state later. With iCloud, only “the most important data” on your device will be backed up to your iCloud account. For example, iCloud backups don’t include a complete copy of the music and videos on your device — but iTunes backups will. This allows you to save limited iCloud space and avoid having to upload and download huge amounts of data. What this highlights is just how important it is to, if possible, regularly back up your iPhone and iPad to iTunes on a computer - so that you have a complete backup of your device should you ever need it - rather than just a partial iCloud backup. Where are iTunes Backups stored on your computer iTunes backups are saved away to an hidden area on your Mac or Windows computer. In the case of this client's Mac, we could see all her iTunes backups in the folder ~/Library/Application Support/MobileSync/Backup You can get to this hidden folder by opening Finder, then choosing Go from the menu bar and clicking on Go to Folder, and typing in the above path. (Refer later for where to find the backup folders on Windows.) 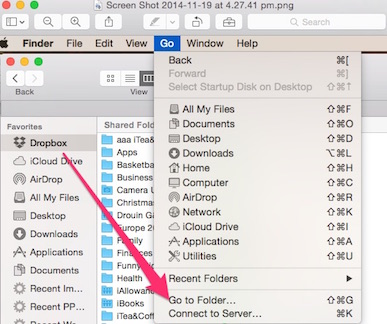 In that Backup folder, you will see a list of backup folders, which contains a heap of strangely named files that are actually the contents of the backup. The Date Created for each of the folders in Backup provides you with the backup's date. (If you don't see Date Created in the columns provided, right-click on the column heading area and 'tick' the Date Created option from the list that drops down. This will add the column to your Finder view.) Below is a sample of my own iTunes backup folders. I have clicked on the Date Created heading to sort the list of folders in descending Date Created order, so that the newest is at the top. 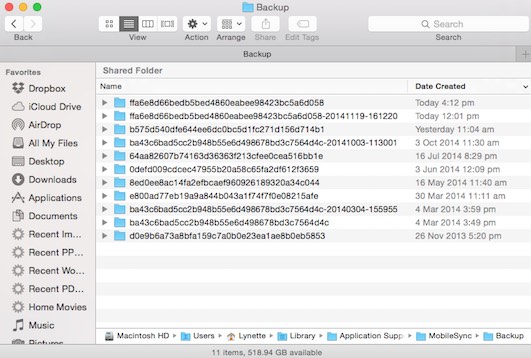 When we looked at my client's backup folders on her Macbook in the same way, we were able to see that she had a backup from just before and after the date that she thinks she deleted the Notes. So hope was restored. But how can you then find what you need in the iTunes Backup The question is then, how can she view the contents of her backup in a way that allows her to locate her missing Notes - given that there is nothing that would indicate which of the files in the relevant backup folder contains her deleted Notes. Double-clicking on a few files at random shows that these backup files are sometimes photos, sometimes text with gobbledy-gook - but finding a couple of Notes amongst thousands of files would be like finding a needle in a haystack. (If you don't have much in your backup, this solution might be workable for finding a particular file.) The easiest way to extract the information contained in this set of folders is to download a product that allows you to view the contents of the backup. The particular product that I use for cases like this is Aiseesoft Mac Fonelab. This app is not available from the Mac App Store, so must be downloaded from the Aiseesoft website. Below is an image of the Fonelab screen. In this image, the app is in the process of scanning my nominated iTunes backup to identify all the Photos, Contacts, Messages, Notes, etc. Once it has finished this scanning, I will be able to look through what it found. 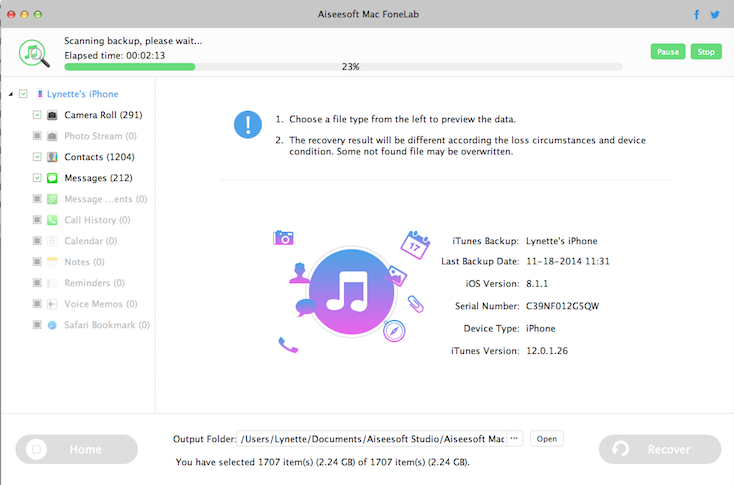 The below images shows the list of the Notes that Fonelab found in my backup - I can view the content of each note and, if I choose, can 'recover' these notes to a specified Output folder. 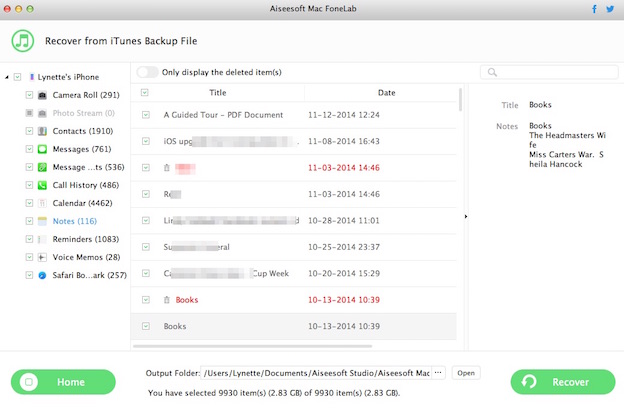 While this product is not cheap (right now, it is US$48.96), it can be a real lifesaver for those times that you lose something really important. Some other options (which I have not tried myself, so cannot provide any recommendation) are: So there is hope for my clients lost Notes, if she wants to invest in a product such as those described above. Location of iTunes Backups on a Windows Computer (Windows Vista, 7 and 8) \Users\(username)\AppData\Roaming\Apple Computer\MobileSync\Backup\ Related Handy Hints and Articles by iTandCoffeeThe below elated hints and articles have been published previously on the iTandCoffee website. Blog Articles can be viewed by anyone, but Handy Hints can only be viewed by members of The iTandCoffee Club - why not join today to be able to view these great tips and hints any time. iTunes and iCloud
Housekeeping - Data Storage, Backup, Battery, Deleting, Troubleshooting
21/9/2014 0 Comments Client question: Do I have to back up both my iPad and iPhone? Can I do this by just plugging into my computer?Sandy asks: If I back up the iPhone, do I also need to back up the iPad? AND when I do the backup, do I just plug the unit into the computer when it's on?
Answer: The iPhone and iPad need to each be backed up separately - backing up one does not back up the other. You are correct that you can back up your devices by plugging in to your computer - by using iTunes. (I am assuming here that you are plugging in to the computer that you normally sync your devices with.) Just make sure that iTunes starts up and the message at the top shows that the device you have plugged in is backing up (as well as sync'ing) your device. If it doesn't back up automatically, you can force the backup of the device by right-clicking on the device in the Sidebar, and choosing Backup. (If you don't see a sidebar, you can turn this back on from the View menu.) The other option is to back up your devices to your iCloud rather than to a computer - something that can happen automatically each day without you having to remember to do it!
After trying initially to work out the source, she determined pretty quickly that she needed to call the fire brigade, who were there within 4 minutes! It turned out that the source of the smoke was a fire that had started in her computer tower, down under her desk!
While she was so incredibly lucky to have been awake and have detected the smoke so early, her poor computer was not so lucky! And while she had a back up of her important files, what she did not have on that backup was her list of contacts - all the email addresses for family, friends, work colleagues etc. So her lesson learned, she called iTea&Coffee to find out the best way of ensuring now that her contacts (especially) are 'cloud-based' so that she can access them even if something were to happen to her computer. She was very keen for me to get the message out to other iTea&Coffee clients and subscribers about the lesson she has learned - don't think this sort of thing can't happen to you! If you need help with better understanding or putting in place any cloud storage solutions for your contacts and other important data, just contact iTea&Coffee on 1300 885 420 - or email enquiry@itandcoffee.com.au.
Well, there are some great alternatives to iCloud backups for your photos - and they are definitely cheaper than Apple's additional iCloud storage options. Here are some of the alternatives and their comparative pricing ...
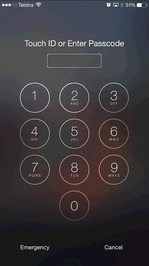
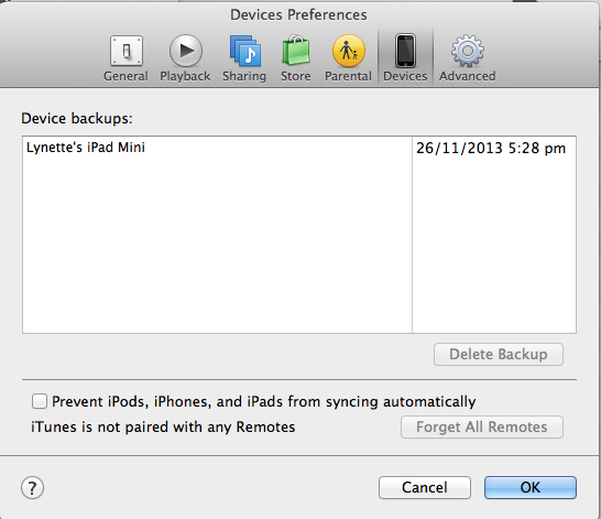
So if your iCloud backup is bursting at the seams, why not set your photos to back up to one of these 'clouds', and turn off your iCloud backup of your Camera Roll. iTea&Coffee can help with all this if it all sounds too complicated or if you're just not sure how to get it all workings - call 1300 885 420 or email enquiry@itandcoffee.com.au. Check out this recent article from The Age, which looks at the pros and cons of some of these services for backing up your photos. I have had two mums contact me in the last two days with this very question (one for an iPad and one for an iPod Touch)! Especially for kids who use iPads for school, this can be very stressful and upsetting. So I thought it worth describing your options here. iTea&Coffee can help if you need assistance or advice - just call 1300 885 420 or email enquiry@itandcoffee.com.au. But before we go into what to do in this situation, let's talk about how you can make sure a lost passcode is not a disaster for you. Please, please MAKE SURE YOU HAVE A BACKUP OF YOUR DEVICE, whether it be a backup via iTunes to a computer, or a backup to iCloud. At the very least, make use of iCloud to ensure you key information (Contact, Calendar, Reminders, Notes, etc) are safely stored in the 'cloud'. If you don't know how to do this or need some advice, iTea&Coffee can help. How can you get around a lost passcode? Unfortunately, if the passcode to your i-Device has been forgotten, the only way to recover is to start by resetting your device back to its factory settings - which means everything will be wiped from the device. But it is not all bad news (hopefully!) Whether you can recover some or all of your device's data will depend on whether you are using iCloud and/or whether you have previously sync'd your device with a computer using iTunes (or at least told your device to 'trust' a computer). If you have previously sync'd with a computer or established a 'trust' relationship with a computer ... ... you will be able to plug it in to this computer, bring up iTunes, choose the Restore option, and then choose a backup from which to restore. This could be a backup from the computer, or from iCloud. The iOS Setup Assistant will ask which type of backup you would like to restore. Of course, this is your best case scenario, especially if you have a recent backup. If you don't have a backup from which to restore, you need to try to take a backup first. This is only possible if your device has previously sync'd with the computer or has just been told to 'trust' the computer. (If neither of these has occurred, you won't get the option to backup or restore.) If you have previously sync'd with the computer, do a sync and backup before you restore. If you have previously just told your device to 'Trust' another computer (but have never sync'd with that computer), you can still choose to just backup your device to that computer so that you can restore from that backup. (Just be careful not to sync with that computer if it doesn't contain all the media that was previously sync'd to your device, because you will wipe things you didn't mean to wipe! This can be a real trap for those who don't really understand iTunes and sync'ing.) Before wiping and restoring your i-Device, you can double-check you have the necessary backup available on your computer by going to iTunes menu, then Preferences (or Properties if you are on Windows), looking at the Devices 'tab' and seeing whether your device's backup is in the list and has the right date and time (see image below) If you want to double-check the date of your latest iCloud backup, you can go to another device that is connected to that iCloud (if you have one) and go to Settings->iCloud->Storage and Backups->Manage Storage, and touch on the name of the device for which you don't have the passcode. This will tell you when that backup was last taken. Having checked that you have a backup available, you can then safely choose to Restore, which will wipe the device completely. When the iOS Setup Assistant appears, choose to Restore from iTunes Backup or Restore from iCloud. You should then be able to reset you passcode.
If you have not previously sync'd with a computer, set up a 'trust' relationship or can't access any such computer any more ...
... there are a couple of options. If you have 'Find my iPhone' turned on for the locked device (through iCloud), you can choose to do a remote wipe of the device, which will restore it to factory settings - and hopefully then allow you to restore from an iCloud backup (if you were backing up the device to iCloud of course!). If 'Find my iPhone' was not turned on, you will need to use a computer that has iTunes and put your device into something called 'Recovery Mode'. The following are the instructions from the Apple Support website:
If you don't have an iCloud backup but still had iCloud turned on, you will at least get back all of your Contact, Calendar, Reminders, Notes, Safari bookmarks, Photo Stream and Documents & Data as soon as you sign in with your iCloud Apple ID (assuming you had those iCloud features switched on!). Once I have restored from backup, will my device have everything it previously had? Backups don't contain content synced to the device, such as movies, music, podcasts, and apps. These are re-downloaded when you sign in to the Store with your Apple ID. Any music that you did not purchase with your Apple ID will be not be restored to your device - you will need to sync with the device from which the music came to re-instate it. Below is the list of things that do get backed up.
|
What's on at iTandCoffee ?Below is our list of videos, classes and other events that are coming up soon.
Videos shown are offered for eligible members of the iTandCoffee Club. If you have questions, why not join fun and informative 'user group' meetings, held once a month. All iTandCoffee classes are run as online classes (using Zoom), which means you can attend from anywhere.
�
|


27 Sycamore St, Camberwell, Victoria Australia
Call 1300 885 420
to book an appointment or class, or to enquire about our services and products

|
SENIORS CARD WELCOME HERE:
Seniors Card holders qualify for a 10% discount on all classes booked and paid for online (excludes PTT sessions and classes already discounted during COVID-19 crisis). To activate the discount at the time of booking, select Redeem Coupon or Gift Certificate and enter 10OFFSEN before selecting Pay Now. |

© 2012-2024 iTandCoffee Pty Ltd. All rights reserved ACN: 606 340 434